Video Bridge
- Video Bridge Guide for Presenters and Guest Admins
- About the video bridge (moderators)
- About presenter webcam layouts
- Change the presenter webcam layout on the video bridge
- Pin presenter webcams on the video bridge
- Video Bridge Events - Speaker Can't Connect
Video Bridge Guide for Presenters and Guest Admins
A video bridge allows presenters to connect to an event and broadcast from different camera sources and locations. As a presenter, you will join the event from your computer and connect the video source that you'll use to speak to the audience. Often this is a webcam, but you can also broadcast and present from a video conferencing system, Skype for Business, or a telephone (where you're not on camera).
Use this guide to learn how to test your system and connect to the video bridge.
This guide contains the following topics:
System requirements
All presenters and venues must meet the following minimum system requirements:
- Operating system - Windows 10, Windows 8.1+ Pro, macOS 10.14+
- Processor - Intel Core i5 3.0GHz or equivalent
- RAM - 4GB
- Internet connection - A dedicated and hardwired high-speed connection of 1.5 Mbps+ (upload and download). We do not recommend using a Wi-Fi connection since it is prone to dips in bandwidth that can negatively impact your video connection.
- Internet Browser - Chrome (latest version), Firefox (latest version), Microsoft Edge (latest version)
Note: Firefox does not support screensharing for Video Bridge at 720p events.
- Webcam - High quality or HD webcast (for example, Logitech C920)
- Microphone - Headset microphone or webcam mic with built-in noise-cancelling
Note: If you are using a microphone, use headphones or earbuds to prevent feedback from your computer speakers.
Before the event, presenters and venues must also:
- Plug in their computers. Do not run an event on battery power.
- Disconnect from the VPN.
Test your system before the event starts
Don't want to read? Watch the video.
It's important that you make sure your system is compatible before the event begins to identify and resolve any issues. At least 48 hours before the event, join the Live Studio and run a diagnostic on your system with the network and equipment you plan to use on the day of the event. This checks the quality of your audio and video connections.
You should have received an email with login details and a link to the Guest Admin or Guest Presenter Access site. The Guest Admin site includes a button that lets you enter the Live Studio.
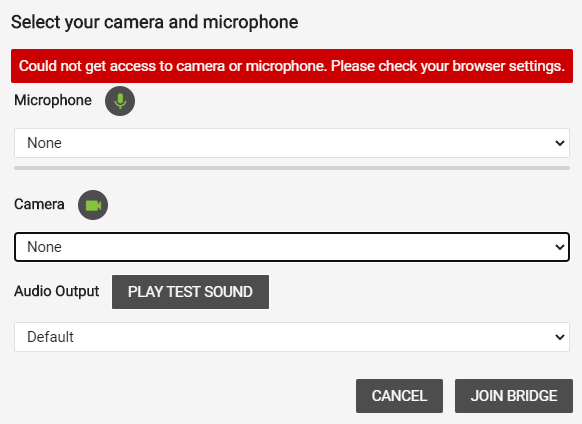
To test your webcam and microphone:
- Sign in to the Guest Admin site and click Live Presenter Studio.
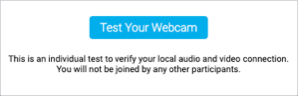
- In the Live Studio, click Test your webcam.
- Enter your name and click Next.
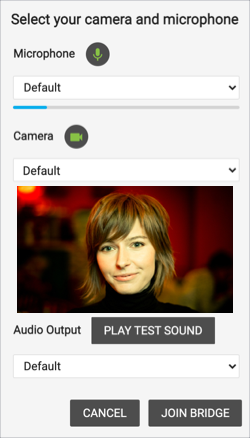
- Select the Microphone, Camera, and Audio Output sources you will use during the event. Confirm that the microphone volume level and webcam preview work properly and click Play Test Sound to make sure you can hear the event audio during the event.

- Click Join Bridge and follow the guided connection test instructions.
The test records a short clip of your audio and video and plays it back to you. Make sure the video plays clearly, without feedback or echo. If it does not record correctly, there could be a network connection issue. Check that you have a wired (LAN) connection to the internet and that it is active.
If you have any issues, run the test again. If you continue to have issues, contact support or your event host.

Connect to the video bridge
Don't want to read? Watch the video.
To join the video bridge:
- Sign in to the Guest Admin site and click Live Presenter Studio.
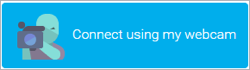
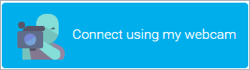
- Click Connect using my webcam.
- Enter your name and click Next.
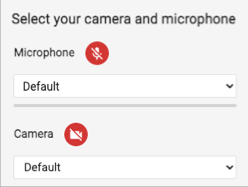
- Select the Microphone, Camera, and Audio Output sources you want to use for the broadcast. Confirm that the microphone volume level and webcam preview work properly.
If you are a technical assistant or moderator who will not speak or appear on camera, click the Mic button to mute your microphone and click the Camera button to turn off your webcam.
- Click Play Test Sound to make sure you can hear the event audio during the event.
- Click Join Bridge.

About the video bridge (moderators)
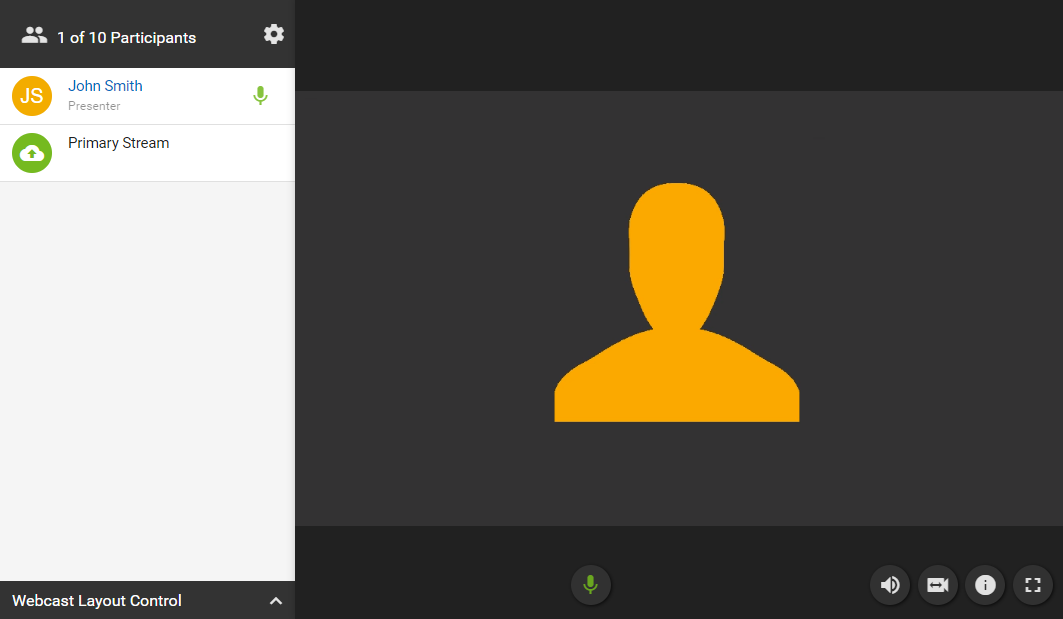
As a moderator, you have full control of presenters and video bridge functions. You can share your webcam, share your screen or an application window (720p events only), and manage your own event experience. Click on a presenter's name to hide their webcam, mute their audio, update their name, promote them to a moderator, and disconnect them from the video bridge.
If you're using an advanced video bridge, you can also lock the Live Studio to prevent other presenters from joining, dial out to a Microsoft Teams or Zoom room or Skype for Business using a SIP, H.323, or RTMP connection, and stream to an external platform like Youtube Live or Facebook Live.
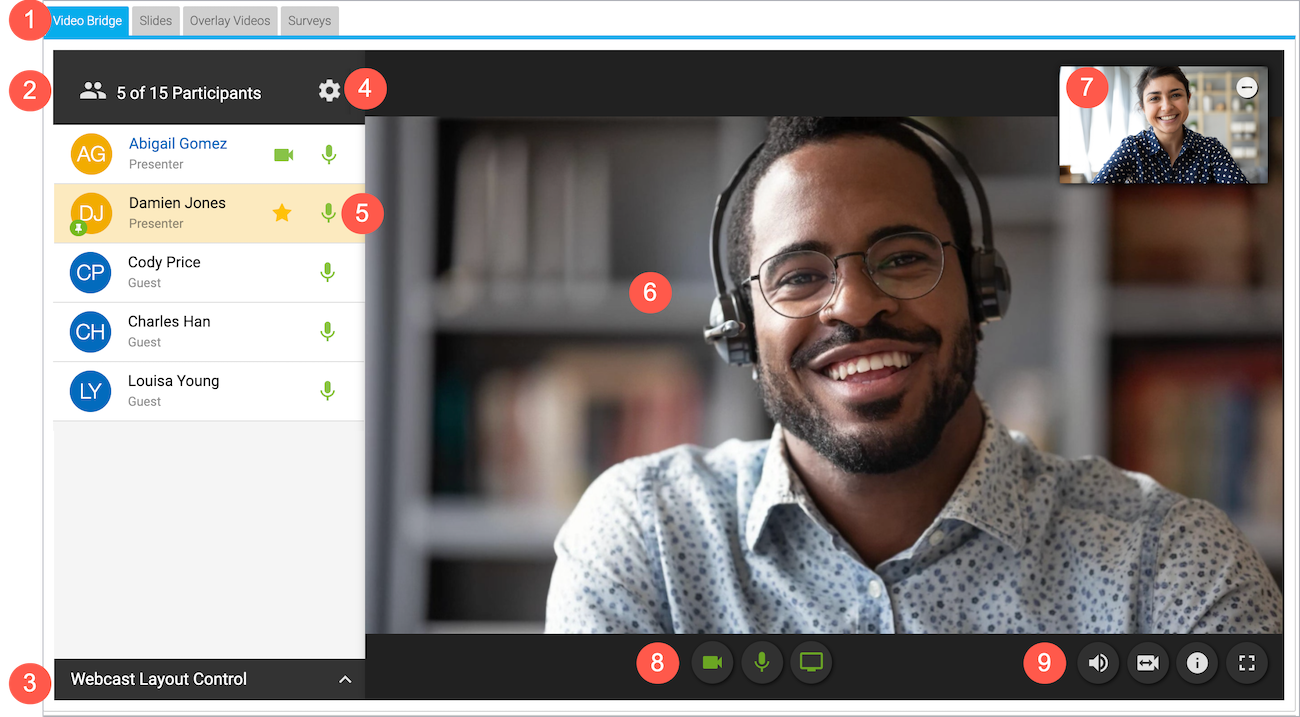
The following example shows the moderator view of the video bridge with a 720p video player and advanced video bridge turned on.
Use the following table to learn more about the video bridge controls and options.
| Number | Element | Description |
|---|---|---|
| 1 | Live Studio tabs | Controls for different aspects of the event are grouped into tabs. Click the Video Bridge tab to manage your own webcam and audio, select a webcam layout, and to manage presenter webcams and audio.
Controls for slides, surveys, overlay videos, and other content you uploaded to the event are displayed in their own tabs next to the Video Bridge tab. |
| 2 | Presenter list | The moderators and presenters who are connected to the video bridge, listed alphabetically. You and other moderators (with Presenter role) are listed first, followed by all other presenters (with Guest role). Use the buttons next to your name to mute yourself or turn off your webcam. Click a presenter’s row to mute their mic, promote them to moderator, change their display name, and disconnect them. |
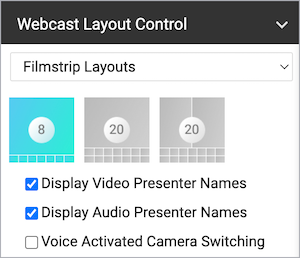
| 3 | Webcast layout controls | Click Webcast Layout Control and choose whether to automatically switch between presenters' webcams as they speak (voice-activated switching), include their names on the screen, and how webcams are arranged on stage (one webcam or multiple in a grid view or filmstrip view). To learn more, see Change the presenter webcam layout on the video bridge. |
| 4 | Advanced video bridge settings | Additional options for advanced video bridge. Click the Settings (gear) button to lock the Live Studio and prevent other presenters from joining, dial out to an external meeting room, and livestream to an external platform. |
| 5 | Pinned presenters | A pin next to a presenter's name indicates their webcam is pinned on stage (voice-activated camera switching is off). If a presenter is pinned in the Single Speaker layout or pinned to a large frame in a Filmstrip layout, their row is highlighted yellow and a star is displayed next to their name. |
| 6 | Active talker | The webcam of the presenter who is speaking. By default, Voice Activated Camera Switching is turned on and highlights the webcam of the presenter who is speaking (and recent speakers when using a Grid or Filmstrip layout). There is also a speaker icon that is displayed in the presenter's row in the presenter list while they're talking.
To choose whose webcams are on stage, turn off voice-activated switching and Pin presenter webcams on the video bridge. |
| 7 | Your webcam view | A live view of your webcam. Click the Hide (-) button to hide your self-view. |
| 8 | Your video bridge controls | Turn your webcam on or off, mute or unmute your audio, and share your screen (720p only). |
| 9 | Additional video bridge controls | Change your audio output volume and device, change your webcam and microphone connection, check event streaming details, and expand the Video Bridge tab full screen. |
About presenter webcam layouts
On the video bridge, you can choose how you want to arrange presenter webcams and which presenters to display to the audience during the Live event. This article introduces presenter webcam layouts, explains how voice-activated camera switching works with them to manage who is on stage, and how you can manually "pin" presenters on stage.
Important: To see the video bridge and interact with other presenters, you must join with a webcam. Presenters who select I will not be appearing on camera won’t be able to see or hear presenters who have joined the video bridge.
Jump to: Presenter webcam layouts | How the video bridge fills the stage) | Voice-activated camera switching | Pin presenters on stage
Presenter webcam layouts
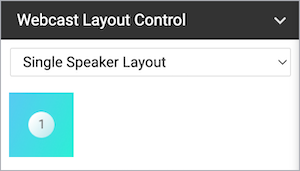
Presenter webcam layouts control the number of presenters on stage and how their webcams are arranged. By default, the event shows one presenter - Single Speaker layout. You can change this layout before the event begins and at any time during the Live event.
Layouts include:
- Single Speaker - displays one presenter at a time. This is the default layout.
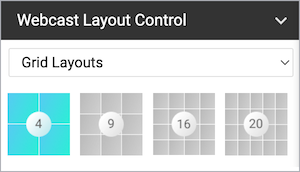
- Grid – displays up to 4, 9, 16, or 20 presenters in equally-sized frames
- Filmstrip - displays up to 8 or 20 presenters, with one or two presenters highlighted in large frames above a filmstrip with the other presenters
How the video bridge fills the stage
The frames in the layout are initially filled in the order that presenters join with a webcam. The number of available spots on stage depends on your selected layout. The video bridge doesn't set aside empty frames; instead it adds frames as needed, for each presenter.
Note: If a presenter joins with a webcam and then turns off their webcam, their frame is still displayed on stage and is blacked out.
- By default, the Single Speaker webcam layout is selected and the first presenter who joined is displayed on stage.
- In Grid layouts, frames are filled from left to right, one row at a time. Once a row is filled, a new row starts below the previous one. The first presenter to join with a webcam is in the top left frame.
- In Filmstrip layouts, the first one (or two) presenters who joined are displayed in the large frames, and remaining presenters fill the filmstrip from left to right, in the order they joined. Like grids, a new row starts once the first row is filled. The filmstrip has seven frames per row. The 20-presenter filmstrip has three available rows.
That's the initial order. Now let's look at voice-activated camera switching.
Voice-activated camera switching
Voice-activated camera switching tracks when presenters speak and keeps a history of most- to least-recent speakers. It uses this information to adjust who is on stage and makes sure the active talker is visible. This varies depending on the webcam layout you select. When you join the video bridge, voice-activated camera switching is on by default.
When there are more presenters than spots available, other presenters remain off-stage until they speak. Then, voice-activated camera switching moves them to the stage, bumping another presenter off.
- In the Single Speaker layout, the active talker replaces the presenter that spoke previously.
- In Grid layouts, presenters remain in their own frames while speaking. If an off-stage presenter speaks, that presenter moves to the grid, replacing the presenter who spoke least recently, no matter where they are in the grid.
- In Filmstrip layouts, the active talker is displayed in a large frame above the filmstrip. In the two-frame layout, the large frames show the active talker and the presenter who spoke immediately before. The filmstrip shows a history of presenters who have spoken, left to right from most to least recently.
When a person in the filmstrip speaks, they move to a large frame and the person previously in that frame moves to the first spot in the filmstrip, shifting other presenters to the right. In the two-frame layout, the presenter in the large frame who spoke less recently is replaced.
Pin presenters on stage
To choose who is on stage, turn off voice-activated camera switching and pin presenters. Pinned presenters remain on stage whether they are speaking or not.
The number of presenters you can pin is limited by the number of frames included in the layout. When there are more presenters than spots available, other speakers remain off-stage, but can still be heard when they speak. To remove presenters from the stage, unpin them.
- In the Single Speaker layout, pin the presenter you want to keep on stage. In the presenter list, a yellow star indicates which presenter is highlighted (that is, pinned on stage).
- In Grid layouts, pin the presenters you want to keep on stage, up to the number of spots in the grid. If they were already on stage, presenters remain in their places when you pin them.
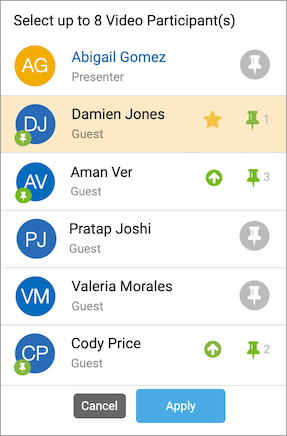
- In Filmstrip layouts, presenters are displayed in the order that you pin them, starting with the large frames and then filling the filmstrip from left to right. The first one (or two) presenters you pin are highlighted in the large frames above the filmstrip as lead presenters.
Set the lead presenters (filmstrip only)
In the presenter list, pins are numbered to let you know the order the presenter webcams are displayed. The yellow star next to pin 1 (and pin 2) indicates those presenters are highlighted in the large frames above the filmstrip.
To move a presenter to a large frame above the filmstrip, click their Up arrow button. The person previously in that frame moves to the first spot in the filmstrip, shifting other presenters to the right. In the two-frame layout, the presenter with pin 2 is bumped to the filmstrip.
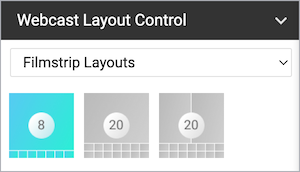
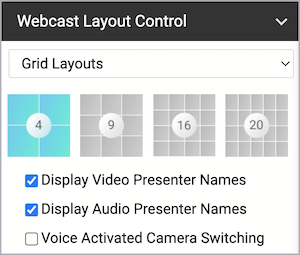
Change the presenter webcam layout on the video bridge
Change the webcam layout to display more presenters during the Live event. By default, the Single Speaker layout is selected and displays the active talker to the audience. You can change this layout before the event begins and switch layouts any time during the Live event. To learn more about presenter webcam layouts, see About presenter webcam layouts.
By default, Voice Activated Camera Switching is turned on and displays the active speaker (and recent speakers when using the Grid or Filmstrip layout). To display specific presenter webcams to the audience, see Pin presenter webcams on the video bridge.
Note: Only moderators can change the presenter webcam layout. To allow a presenter to change the webcam layout, promote them to a moderator.
To change the presenter webcam layout:
- In the Live Studio, under the presenter list, click Webcast Layout Control.
- Select the number of presenter webcams you want to display. For:
- Single Speaker layout, one presenter is already selected.

- Grid layouts, you can select a 2x2, 3x3, 4x4, or 5x4 grid.

- Filmstrip layouts, you can show up to 8 presenters with one presenter highlighted in a large frame or 20 presenters with one or two presenters highlighted.

- Single Speaker layout, one presenter is already selected.
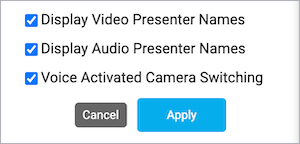
- Optional. Select Display Video Presenter Names to show the names of presenters at the bottom of their webcams. Display Audio Presenters Names and Voice Activated Camera Switching are turned on by default.

- Click Apply.
Pin presenter webcams on the video bridge
By default, voice-activated camera switching is turned on and controls who is on stage.
If you'd like to choose which presenter webcams are on stage, turn off voice-activated camera switching and pin presenters to the video bridge. In Filmstrip layouts, you can also select the presenters to highlight above the filmstrip. To learn more, see About presenter webcam layouts.
Note: Only moderators can pin presenter webcams. To allow a presenter to pin webcams, promote them to the Presenter role.
Jump to: Pin presenters (single speaker and grid) | Pin presenters and set the order (filmstrip)
To pin a presenter's webcam (single speaker and grid layouts):
- In the Live Studio, under the presenter list, click Webcast Layout Control.
- Clear the check box next to Voice Activated Camera Switching.

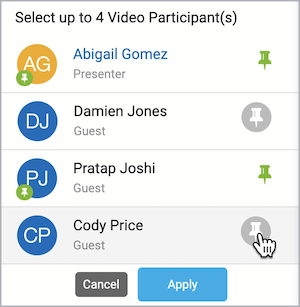
- In the presenter list, click the Pin button next to each presenter you want to display on stage. You can pin up to the total number of spots in the selected layout.

In the Single Speaker layout, a star next to a pinned presenter's name indicates they are highlighted on stage.
- When finished, click Apply.
The video bridge updates and shows the presenters you pinned.
To pin presenters and set the order (filmstrip):
- In the Live Studio, under the presenter list, click Webcast Layout Control.
- Clear the check box next to Voice Activated Camera Switching.

- In the presenter list, click the Pin button next to each presenter in the order you want to display them on stage. You can pin up to the total number of spots in the selected layout.
In the presenter list, pins are numbered to let you know the order the presenter webcams will be displayed. The yellow star next to pin 1 (and pin 2) indicates those presenters are highlighted in the large frames.

- To highlight a presenter in a large frame above the filmstrip, click the Up arrow button next to their name.
- When finished, click Apply.
Video Bridge Events - Speaker Can't Connect
Connecting Using a Webcam
- If a presenter can connect to the Video Bridge but cannot be seen/heard (and appears as an orange silhouette), this indicates their network is blocking access to their camera and/or microphone.
- If you are connected to a VPN, please disconnect and try to join the Video Bridge again. Avoid using a VPN connection when presenting.
- If you are joining from a Corporate network, your network's security may be blocking access to your camera and microphone. Please test using another network, like a public or home network, to confirm if the issue continues. Your IT department would need to allow access to your device using the requirements outlined here: https://www.webcasts.com/networkresources/

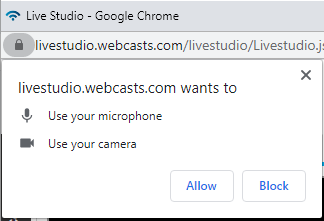
- You should see a prompt in the browser asking if you would like to use your webcam/microphone. Click Yes when prompted.
- Close any programs and other browsers that could be using your webcam and make sure none of these programs are running in the background (ex. Zoom, Microsoft Teams, etc.).

- Check your browser’s settings to make sure the browser can connect to webcam and microphone.
- For Chrome:
- At the top right, click Settings (three vertical dots).
- In the "Privacy and Security" section, click "Site settings".
- Under the "Camera" or "Microphone" options, select "Ask before accessing".
- To remove permissions you already granted/blocked to sites, click on the Camera or Microphone option. Make sure there are no “.webcasts.com” URLs listed as “Blocked”.
- For Firefox:
- Click on the Show Site Information button (top left of the browser next to the URL).
- Click on the arrow button next to the “livestudio.webcasts.com” name.
- Click More Information.
- On the Permissions tab, make sure the Use the Camera and Use the Microphone options are set to Use Default or Allow.
- For Microsoft Edge:
- At the top right, click Settings (three horizontal dots).
- Click on the Menu button in the top left (three horizontal lines).
- Select Site Permissions in the list.
- Under "Camera" or "Microphone," make sure they are set to Ask First.
- To remove permissions you already granted/blocked to sites, click the Camera" or "Microphone" option. Make sure there are no “.webcasts.com” URLs listed as “Blocked” in the Managed exceptions section.
- Internet Explorer is not supported for use with the Video Bridge as the Video Bridge requires your browser to support HTML5.
- For Chrome:
- Ensure your Operating System is not blocking access to your Camera or Microphone.
- For the Windows 10 Operating System, follow these instructions: https://support.microsoft.com/en-us/help/4468232/windows-10-camera-microphone-and-privacy
- For the Mac OS, follow these instructions:
Connecting Using a VCU
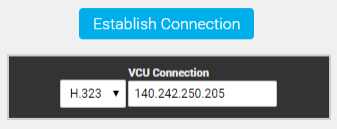
- To connect your VCU to the presentation, the platform will dial out and connect to the address listed in the Live Studio. Click Establish Connection to connect your VCU to the event. If the VCU connection fails initially, you will be able to re-establish the connection.
- Please ensure the VCU is on and streaming an audio/video feed. Your VCU needs to accept an inbound connection in order to connect to the event. Contact your IT department to confirm if your network will allow an inbound connection.
- Make sure you have selected the correct protocol for your call. Select the H.323 or SIP protocol depending on what protocol your video conferencing device supports. If the device supports URI and/or IP calling, please try both options. Contact your VCU provider to confirm which protocol(s) are supported.
- Double check that you are using the correct address for your VCU, confirming the alias (for a SIP call) or IP (for a H.323 call). Make sure your VCU doesn’t require a PIN to be included in the address. This information can be accessed in your VCU setup.
- Make sure the VCU isn’t connected to another call and disconnect if needed.
- If the VCU disconnects, you can quickly reconnect using the controls in the Live Studio.

Connecting Using Skype
- Close any programs and other browsers that could be using your webcam and make sure none of these programs are running in the background.
- For Lync/Skype for Business users: Your company may block access to external locations, which would prevent you from connecting to the Video Bridge. Below is a link to update your Lync/Skype for Business settings to allow external access. Depending on your setup, this may require your IT department to allow access (Lync/Skype for Business). Help Information: https://support.office.com/en-us/article/Allow-users-to-contact-external-Skype-for-Business-users-b414873a-0059-4cd5-aea1-e5d0857dbc94
- For regular Skype users: You need to provide an email address for your Skype account to connect. Make sure your Skype account is associated with a Microsoft email address to utilize Skype on the Video Bridge (Skype Acquisition).
If you continue to have issues, make sure you meet the network requirements for the Video Bridge listed here: https://www.webcasts.com/networkresources/